2015年12月9日 星期三

Android 開發(一百零七) Android Studio 2.0 hotkey 筆記


 .settext -> .setColor  可以用tab不要用enter


Bitmap b =  null;
想要看更多可能的提示  control + shift + space 可能可以看到更多有用的提示


alt + or   可以協助選取


alt + enter 可以將constructor直接建立field 並且sign


也可以直接將instanceof 直接轉型


fori =>  live template
list.fori  => for(int i = 0; i< list.size() ; i++)

logi => Log.i(TAG, "liveTemplate: 123");
lost => private static final String TAG = "MainActivity";
MainActivity 是依照class name

logm =>  method 參數印log 

public void send(String p1, String p2){
    Log.d(TAG, "send() called with: " + "p1 = [" + p1 + "], p2 = [" + p2 + "]");
}

logr => return value 印出來
wtf => Log.wtf(TAG,"msg",new Exception);

command + shift + A => action name 快捷鍵提示視窗
選擇 replace structure  可以使用regex架構的 replace

shrinkResource = true
可以減少resource的數量,但是會減慢app的build速度

其他快捷鍵
Find symbol: OPT+CMD+O
Find Commands : Shift + CMD + A
View implementation of symbol: CMD+B
View implementation : OPT+CMD+B
recently used files: CRT+TAB


debug:
Evaluate 快速debug


condition debug break 例如recycler view你不會想針對每個一個一個看,你只會想要看某一個的時候,例如可以針對position==3
condition debug -> more info 可以做到增加log
可以直接在debug - >  console裡面看到,記得要將Suspend的勾勾取消選取


Android 開發(一百零六) 利用retrofit & gradle flavor來建立測試環境

retrofit 是個非常方便開發的library,利用它我們可以快速開發,而且快速測試,但是該怎麼做? 今天就要來稍微說明一下,2015 Android Dev Summit提到的做法.

在說明如何測試之前,必須先說明一下gradle flavor,如果不知道gradle flavor的可以參考一下之前的文章
Gradle Flavor ,flavor 的好處是,假設今天我們有兩種flavor,
normalMode & mockMode,當我需要建置正常的版本時,我只需要使用normalMode flavor就好,當我需要建置debug mode時,我只需要使用mockMode就好了.

不過這樣有什麼好處?

讓我們繼續看下去….

同樣一個getUsers()的method
在normalMode底下回傳的資料是真正api 打到server的資料
而在mockMode時則是回傳我們自己偽造的資料

以這種idea去設計的話,我們可以想像出一種架構

interface IApiService{
    Users getUser();
}

然後在normalMode時

NormalService implements IApiService{
    public User getUser(){
        //do api call and get User Model
        //....

        return user;
    }
}

然後在mockMode時則是

MockService implements IApiService{
    public User getUser(){
        //mock test data 
        User user = new User();
        user.name = "ted";
        return user;
    }
}

所以依照上面的範例,我們只需要分別在normal and mock 的folder裡將這兩個檔案放入就完成了,之後只要利用flavor的切換就可以切換成正式資料或測試資料了.

那…..講了這些又跟retrofit有什麼關係?

利用retrofit 我們可以很輕易地做到剛剛這些事情

舉個例子

SimpleService.GitHub github = Injection.getInjection();

    // Create a call instance for looking up Retrofit contributors.
    Observable<List<SimpleService.Contributor>> call = github.contributors("square", "retrofit");

    // Fetch and print a list of the contributors to the library.
    Log.d("Ted","fire");
    call.observeOn(Schedulers.io())
            .subscribeOn(Schedulers.newThread())
            .subscribe(new Action1<List<SimpleService.Contributor>>() {
                @Override
                public void call(List<SimpleService.Contributor> contributors) {
                    for (SimpleService.Contributor contributor : contributors) {
                        Log.d("Ted",contributor.login + " (" + contributor.contributions + ")");
                    }
                }
            });

稍微講解一下上面的code

  1. 首先我們先取得可以call github api 的service
  2. 接著call api github.contributors();
  3. 接著等api 回應,並且顯示log

為了達到 更換資料的
所以我們必須想辦法讓 Injection.getInjection()丟出不同的service

是不是跟第一個sample的概念很像?

所以我們只需要在normalMode讓api真的去打server

public class Injection {

public static SimpleService.GitHub getInjection(){
    Retrofit retrofit = new Retrofit.Builder()
            .baseUrl(SimpleService.API_URL)
            .addConverterFactory(GsonConverterFactory.create())
            .addCallAdapterFactory(RxJavaCallAdapterFactory.create())
            .build();
    return retrofit.create(SimpleService.GitHub.class);
}
}

然後在 mockMode 的時候製造假的資料

    public static SimpleService.GitHub getInjection() {

    // Create the Behavior object which manages the fake behavior and the background executor.
    NetworkBehavior behavior = NetworkBehavior.create();
    // Create the mock implementation and use MockRetrofit to apply the behavior to it.
    NetworkBehavior.Adapter<?> adapter = RxJavaBehaviorAdapter.create();
    MockRetrofit mockRetrofit = new MockRetrofit(behavior, adapter);
    MockGitHub mockGitHub = new MockGitHub();
    SimpleService.GitHub gitHub = mockRetrofit.create(SimpleService.GitHub.class, mockGitHub);
    return gitHub;
}

這樣就行了,之後只需要在開發的時候切換到mockMode就可以使用假的資料去做開發了,是不是很方便啊!!

順便提一下retrofit 有提供mock的lib 讓我們可以方便的mock假的rx資料以及call<>資料
compile ‘com.squareup.retrofit:retrofit-mock:2.0.0-beta2’
compile ‘com.squareup.retrofit:adapter-rxjava-mock:2.0.0-beta2’
而且還可以利用NetworkBehavior的setDelay來延遲api回傳的時間,真的非常的方便.

最後

還是要附一下開發的連結retrofit_with_gradle_flavor

大家快點去嘗試看看吧!!

2015年11月28日 星期六

Android 開發(一百零五) 架構建立,利用retrofit & rxjava 來將資料與UI分離

由於最近有點空閒,所以花了點時間看了一下retrofit & rxjava 搭配起來可以做到什麼成果

在講解之前,不知道大家有沒有一樣的經驗,在寫project時,api的code總是跟UI code綁在一起,造成程式邏輯上很複雜,舉個例子來說,例如 https://api.github.com/repos/square/retrofit/contributors 這隻api ,我希望針對回來的json,filter 出login field為JakeWharton的人,以及contributions field大於10的人,並且分別在UI上做相對應的顯示.

可想而知,作法就會是

  1. 取得json List
  2. 針對List filter 出login field 為JakeWharton的物件
  3. 針對List filter 出contributions 大於 10的物件
  4. 顯示到UI上

從code上面看起來就會

List<GithubJson> list = api.getGithubJson();
List<GithubJson> JakeWhartonList = dofilterEquals(list,   "login", "JakeWharton");
loginListCustomView.setData(JakeWhartonList);
List<GithubJson> OverTenList = dofilterOver(list, "contributions", 10);
contributionsListCustomView.setData(JakeWhartonList);

這樣看起來似乎很漂亮…..那是因為這只是個範例,實際上的code應該會比上面這段code複雜好幾倍,所以這也就讓我們開始思考是否有更漂亮的解決方案.

上面這段code最主要的問題在於,資料,處理資料以及UI顯示的程式碼被混雜在一起,造成之後維護上的麻煩,而且重點是無法測試,如果將上面的code寫在activity or fragment 裡,就會發現當ui 呈現錯誤時,無法知道到底是ui錯誤,資料錯誤或是filter錯誤.

所以為了達到我們想要的目標可測試的程式首先就必須先把ui & 資料分離,目標

MyAppClient apiclient = new MyAppClient();
    apiclient.getFilterAndOverTen(new MyAppClient.ICallBack() {
        @Override
        public void callBack(MyWrapper o) {
            //use MyWrapper to updateUI;
        }
    });

為了達到這個目標,我們可以利用rxjava的特性

SimpleService.GitHub github = retrofit.create(SimpleService.GitHub.class);

Observable<List<SimpleService.Contributor>> call = github.contributors("square", "retrofit");

取得observable之後也就是我們想要取得的資料,接著針對資料做filter的動作

       Observable<List<SimpleService.Contributor>> a = call.observeOn(Schedulers.io())
            .subscribeOn(Schedulers.newThread())
            .flatMap(new Func1<List<SimpleService.Contributor>, Observable<SimpleService.Contributor>>() {
                @Override
                public Observable<SimpleService.Contributor> call(List<SimpleService.Contributor> contributors) {
                    return Observable.from(contributors);
                }
            })
            .filter(new Func1<SimpleService.Contributor, Boolean>() {
                @Override
                public Boolean call(SimpleService.Contributor contributor) {
                    return contributor.login.contains("JakeWharton");
                }
            }).toList()
            .doOnNext(new Action1<List<SimpleService.Contributor>>() {
                @Override
                public void call(List<SimpleService.Contributor> contributors) {
                    Log.d("Ted", "size " + contributors.size());
                }
            });

首先我們要先filter出login field 為jakewharton 的人,所以我們必須針對list去做filter,花了一點時間做研究後,發現必須將

Observable<List<SimpleService.Contributor>> 轉為 Observable<SimpleService.Contributor>

filter的動作才可以正確執行
上面的程式碼就是做這樣的事情,接著另一部分的filter當然也是依樣畫葫蘆,當兩個東西都filter完成後,接著重點就是將兩個filter好的東西合併在一起

Observable.zip(a, b, new Func2<List<SimpleService.Contributor>, List<SimpleService.Contributor>, MyWrapper>() {
        @Override
        public MyWrapper call(List<SimpleService.Contributor> contributors, List<SimpleService.Contributor> contributors2) {
            return new MyWrapper(contributors, contributors2);
        }
    }).subscribe(new Action1<MyWrapper>() {
        @Override
        public void call(MyWrapper o) {
            Log.d("TEd","go");
            callBack.callBack(o);
        }
    });

可以注意到,zip就是將兩個物件合起來,然後合成MyWrapper,回傳給外層呼叫的fragment or activity,這樣就完成了

之後如果ui有所改變,data還是可以重用,如果data有所改變,修改的程式也只會限定在data那包裡面,封裝的效果就出來了,當然需要測試的話也可以輕鬆地做測試了.

最後,還是要依照慣例附上sample囉 https://github.com/nightbear1009/retrofit_rxjava_architech

2015年9月20日 星期日

Trunk Based Developement 概述

Trunk Based Development

最近看到了google 的一些文章,裡面提到了google & facebook 都使用了Trunk Based Development,覺得很有趣,所有就去查了一些相關的文章
Trunk Based Development最特別的地方就是,新的功能並不是開一個新的feature branch做開發,而是直接在trunk 上做開發,當然依然要遵守,每筆commit都不能太過於龐大的守則
由於Trunk Based Development 會使多個功能同時在同一個branch上開發,這也就衍生了另一個問題,假設某些功能是v1.0要進,某些功能是v1.1才要進,那要怎麼處理?
根據martin fowler的說法,我們必須實作feature toogle,講白了點就是類似開關的功能,根據設定檔開啟或關閉該功能,舉個例子來說,某個版本要進v1.1,但是我們的功能在v0.1 的時候就已經開始開發,所以我們必須實作一個開關,避免v1.0的版本會出現這個不應該出現的功能,接著我們可以在v1.1的時候將開關打開,然後在v1.2的時候將開關這個功能拔除並且移除舊的功能.
又或者,我們可以實作branch by abstraction的方法,其實也是一個開關的概念或者是說switch的概念,當沒有切換的時候就使用舊版的作法,當切換的時候則改成新版的做法,至於為什麼要使用abstraction的關鍵字?
其實這也對應到了 OO的概念
針對介面來撰寫程式,而不要針對實作
所以在實作這個功能的時候,首先必須先將共同的邏輯抽離抽成interface or abstract,然後舊版則實作這個interface or abstract,新版也實作這個interface or abstract,然後最重要的是使用者只針對interface or abstract 做動作,然後我們就可以去做switch的動作

TBD的好處

  • 降低test的成本
    • 如果有多個feature branch也就代表有多個branch要執行test,這相對也提升了test 成本
  • always是可以release 的codebase,並且可以根據需求,修改需要release的功能
    • 可以利用開關開啟或關閉某項功能
    • 可以利用開關使用新版或舊版功能
  • 減少merge conflict的機會
    • 由於所有人都在同一個trunk上開發,只要所有的人都保證commit的code並不是過於龐大,就算遇到conflict也可以快速解決
    • 適合多人同時開發的專案

結論

講了那麼多,其實我也還沒有機會實際run過這個流程,不過根據目前的理解,TBD講白了就是把所有的功能都放在同一個branch上開發,然後使用featuretoggle & branch by abstraction來隔開尚未完成的實作,很合理…但是同時也覺得會有很多坑啊!!

reference

http://www.alwaysagileconsulting.com/organisation-pattern-trunk-based-development/
http://martinfowler.com/bliki/FeatureBranch.html
http://www.martinfowler.com/bliki/FeatureToggle.html
http://paulhammant.com/blog/branch_by_abstraction.html

2015年9月15日 星期二

MarkDown

其實這篇文章是想要稍微推薦一下markdown
markdown其實是個很輕量的語法,由於用google blog的介面寫blog真的很麻煩

  1. 沒有code block
  2. 排版十分不易
  3. 沒辦法即時預覽

這些使用markdown語法 + stackedit 之後所有的問題都迎刃而解啊!!
我想應該會使用這個editor寫一陣子吧!!

順便熟悉一下新editor的用法

Android 開發(一百零四) what's new in andorid studio 1.4 preview

先看一下下面這張圖


這代表什麼?
代表或許在android studio 1.4 正式release 之後,或許就可以支援
使用vector 產生圖檔了!!

有興趣的人可以先去下載新版的android studio 1.4 beta
然後將build.gradle的 gradle版本改成1.4.0-beta1

buildscript {
    repositories {
        jcenter()
    }
    dependencies {
        classpath 'com.android.tools.build:gradle:1.4.0-beta1'
        // NOTE: Do not place your application dependencies here; they belong        // in the individual module build.gradle files    }
}

然後就可以使用這項功能了,記得在import圖檔之後要sync一下,接著檔案就會產生了
這對UI真的是一大福音啊!!,之後只要出一張vector就好了!!

不過這項功能目前還沒發佈,可以再期待一下囉!!

Android 開發(一百零三) dex-method-counts

今天要講的是app 的method counts

為什麼我們要注意method counts?
因為android 有65536的method count的限制

如果app的method數超過了65536就會無法build成功,
所以為了提早發現提早治療,所以我們必須常常觀察method數是否超出預期

從前並沒有方便的工具去觀察method數,不過最近觀察到github上有人提供了簡單的檢驗方式 https://github.com/mihaip/dex-method-counts

小弟依照了上面的方式稍微檢驗了我們家的app

其實已經快爆了XD

不過如果你檢驗了app後發現遇到跟我類似的情形的話,其實不太需要擔心
因為google 已經想到了這個,所以他提出了 https://developer.android.com/tools/building/multidex.html

multidex,只要利用multidex就可以解決掉這個問題

根據google 的文件我們首先必須import multidex的lib

dependencies {
  compile 'com.android.support:multidex:1.0.0'
}
接著必須在build.gradle裡加上multidexEnabled

    defaultConfig {
        
        multiDexEnabled true

    }
我們必須將原本的application改成繼承MultiDexApplication

public class MyApp extends MultiDexApplication  {

    @Override
    protected void attachBaseContext(Context base) {
        super.attachBaseContext(base);
        MultiDex.install(this);
    }

這樣就完成了

不過注意一下,multidex還是有一些限制的,
例如必須要在版本14以上,還有可能會造成build的速度變慢之類的問題

最後,如果有寫test case 的人,而且有用AndroidJUnitRunner的話
可能會想問要怎麼在multidex版本上面正常測試

方法很簡單,首先必須在test的folder裡自建一個runner
這個runner必須必得要使用multidex.install

public class MyRunner extends AndroidJUnitRunner {

    @Override
    public void onCreate(Bundle arguments) {
        MultiDex.install(getTargetContext());
        super.onCreate(arguments);
    }
}

接著必須在build.gradle裡加上testInstrumentationRunner

    defaultConfig {
        minSdkVersion 14
        targetSdkVersion 22

        testInstrumentationRunner "com.MyRunner"
        multiDexEnabled true

    }

這樣就完成了,就可以使用舊有的annotation了


2015年6月13日 星期六

Android 開發(一百零二) 利用annotation 處理 enum

在java 中我們常常會使用enum處理多種type,不過android 官方說這種寫法是非常expensive (可能是效率或memory其實我沒有多做研究)所以官方推薦我們利用另外一種寫法,使用annotation來處理

先讓我們看一下下面的程式碼

public class MyMode {
    @IntDef({SUCCESS, NETWORK_FAIL, DATA_ERROR})
    @Retention(RetentionPolicy.SOURCE)
    public @interface APIMode {}

    public static final int SUCCESS = 0;
    public static final int NETWORK_FAIL = 1;
    public static final int DATA_ERROR = 2;

    private int mode = SUCCESS;
    public int getMode(){
        return mode;
    }

    public void setMode(@ APIMode int _mode){
        mode = _mode;
    }

}

我定義了一個MyMode 並且定義了
SUCCESS = 0
NETWORK_FAIL = 1
DATA_ERROR = 2

接著我利用了
@IntDef({SUCCESS, NETWORK_FAIL, DATA_ERROR})
    @Retention(RetentionPolicy.SOURCE)
    public @interface APIMode {}

定義了一個自定義的annotation APIMode 而這個annotation只有在setMode的時候會被用到,這個annotation有什麼功用呢?

主要是在寫程式的時候,我們常常會這樣寫 mymode.setMode(1);
這樣寫程式是可以work的,但是其實很不好讀,對於其他的developer他們還必須進來查看才知道原來setMode(1)是在說 NETWORK_FAIL ,
所以我們該如何避免developer為了方便,而使用這種寫法呢?

我們使用了剛剛的annotation時,如果有人寫同樣的code,我們就可以在android studio上面看到如下圖的提示

而且數字下方會有紅字顯示,這樣developer就比較會去修改它,可惜的是,這種寫法似乎沒有辦法強制build不過(或許使用lint就行)

最後,我覺得這種寫法的確是蠻不錯的,but對於實際在使用上面,感覺大部份的人還是會為了方便而使用enum,不過官方都這麼推薦了,還是可以考慮用看看囉~

Android 開發(一百零一) google play Service Invite friend Api

google play service 在新版本推出了invite friend api ,讓你可以邀請google 上的朋友,
做法其實很簡單,

        Intent intent = new AppInviteInvitation.IntentBuilder(getString(R.string.invitation_title))
                .setMessage(getString(R.string.invitation_message))
                .setDeepLink(Uri.parse("http://tw.91mai.com/ref/0"))
                .build();
        startActivityForResult(intent, REQUEST_INVITE);

使用上面的方式將intent丟出,就會開啟邀請好友的選單,在邀請完成後利用onActivityResult去取得邀請的ids

 @Override
    protected void onActivityResult(int requestCode, int resultCode, Intent data) {
        super.onActivityResult(requestCode, resultCode, data);
        Log.d(TAG, "onActivityResult: requestCode=" + requestCode + ", resultCode=" + resultCode);

        if (requestCode == REQUEST_INVITE) {
            if (resultCode == RESULT_OK) {
                // Check how many invitations were sent and show message to the user
                // The ids array contains the unique invitation ids for each invitation sent
                // (one for each contact select by the user). You can use these for analytics
                // as the ID will be consistent on the sending and receiving devices.
                String[] ids = AppInviteInvitation.getInvitationIds(resultCode, data);
                showMessage(getString(R.string.sent_invitations_fmt, ids.length));
            } else {
                // Sending failed or it was canceled, show failure message to the user
                showMessage(getString(R.string.send_failed));
            }
        }
    }

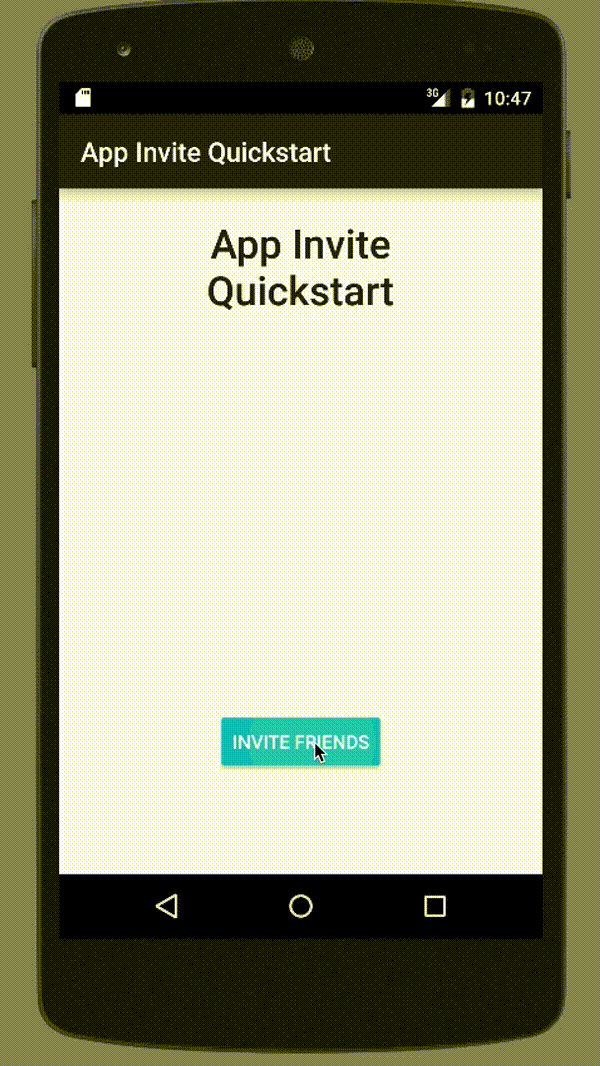
當你將邀請送出之後,你的朋友就會收到邀請下載的信,
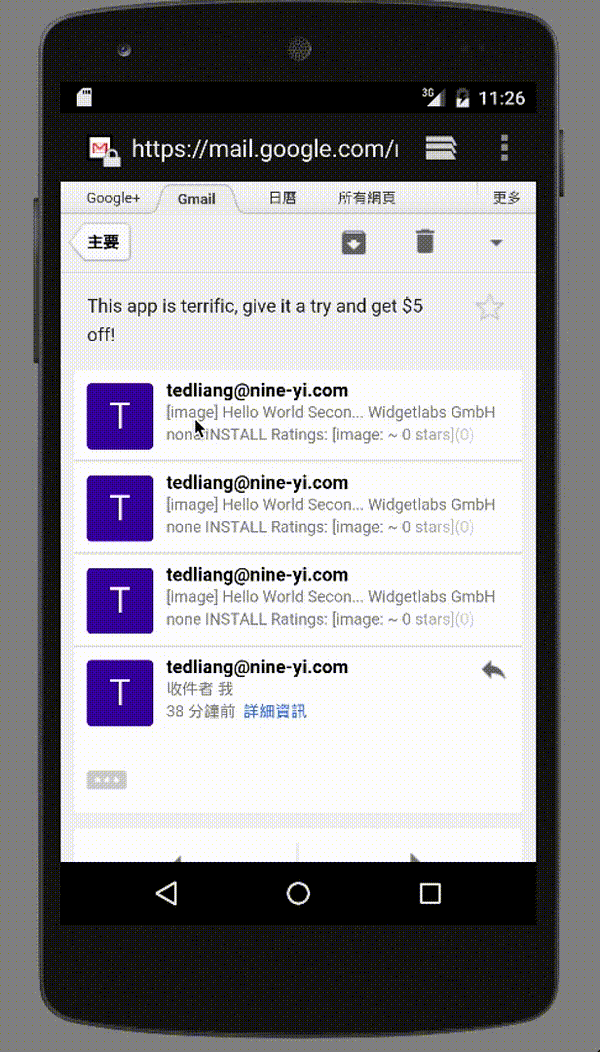
out16.gif
out16.gif

如上方兩張圖,左邊是送出邀請的功能
右邊是好有收到邀請時,安裝後開啟時我們可以從intent中取得相關的link and id

為了要能夠在安裝時取得google play store送給我們的廣播,我們必須註冊receiver

    <receiver
           android:name="com.google.android.gms.samples.appinvite.ReferrerReceiver"
            android:exported="true"
            tools:ignore="ExportedReceiver">
            <intent-filter>
                <action android:name="com.android.vending.INSTALL_REFERRER" />
            </intent-filter>
        </receiver>

接著我們可以利用下方的程式碼取得相關的資訊

if (!AppInviteReferral.hasReferral(intent)) {
            Log.e(TAG, "Error: Intent does not contain App Invite");
           
// Extract referral information from the
String invitationId = AppInviteReferral.getInvitationId(
String deepLink = AppInviteReferral.getDeepLink(intent);

如果我們不需要track 成效的話,邀請的功能在這邊已經結束了
接下來要講的就是,我們可以利用google play service新的api 來trace我們的成效

在使用朋友贈送的信件開啟我們的app之後,我們可以利用google play service來track成效,

        mGoogleApiClient = new GoogleApiClient.Builder(this)
                .addConnectionCallbacks(this)
                .enableAutoManage(this, 0, this)
                .addApi(AppInvite.API)
                .build();

利用AppInvite.API  在api connect成功之後


  String invitationId = AppInviteReferral.getInvitationId(intent);

        // Note: these  calls return PendingResult(s), so one could also wait to see
        // if this succeeds instead of using fire-and-forget, as is shown here
        if (AppInviteReferral.isOpenedFromPlayStore(intent)) {
            AppInvite.AppInviteApi.updateInvitationOnInstall(mGoogleApiClient, invitationId);
        }

        // If your invitation contains deep link information such as a coupon code, you may
        // want to wait to call `convertInvitation` until the time when the user actually
        // uses the deep link data, rather than immediately upon receipt
        AppInvite.AppInviteApi.convertInvitation(mGoogleApiClient, invitationId);

我們可以取得inviteationId ,然後利用 updateInvitationOnInstall 告訴google analytics這個user已經成功安裝.

假設這個邀請是希望新安裝的user可以使用優惠券,那我們可以利用
convertInvitation告訴google analytics有多少使用者安裝後並且成功使用優惠券
也就是可以取得轉換率(我是這樣理解的XD)


最後,由於我是直接拿google 的sample就直接附上相關的網址吧,
有興趣的人可以去那邊做更深入的了解
https://developers.google.com/app-invites/android/guides/app?configured=true

然後下面的網址是appinvite設定的小幫手,在裡面跟著步驟設定之後,你google developer console的設定也會設定完成,個人覺得這個新界面真的是好用很多,大家可以參考看看
https://developers.google.com/mobile/add?platform=android&cntapi=appinvites&cnturl=https:%2F%2Fdevelopers.google.com%2Fapp-invites%2Fandroid%2Fguides%2Fapp%3Fconfigured%3Dtrue%23add-config&cntlbl=Continue%20Adding%20App%20Invites


2015年6月10日 星期三

Android 開發 (一百) What's New in M Permission

在M的版本關於permission做了一個很大幅度的修改,原本的permission在下載時會出現如下方的提示

Screenshot_2015-06-09-22-52-56.png

使用者看到這個提示一定會問的問題是,為什麼需要那麼多權限,你是不是拿了這些權限去做了其他奇怪的事情?
這對app的下載造成了一定的阻礙

還有另一個問題就是,假設新版本比舊版本多了一個權限那麼app就無法自動更新下載,必須使用者確認才有辦法更新app

舉個例子來說
我新增了一個很強大的功能,而且我也如期完成了這個功能,我們行銷打算開始跑新功能的活動,由於我新增了一個權限造成這個版本的普及率要多一個月甚至更久才能普及,那行銷是否就無法如期去跑這個活動.

這其實對許多公司來說都是很大的痛點,明明功能就已經完成了,卻由於沒有良好的普及率造成活動無法如期舉行.

so...針對這兩個問題

android M 提出了新的解決方案

out16.gif

上面的圖示你可以注意到,下載的時候不再有permission的視窗跳出,

其實你不需要擔心,permission並不是不見了,而是只有在需要的時候才會跳出
讓我們再看看下面的圖片

out16.gif

假設上面的按鈕需要使用到phone calls and camera的權限,我可以在使用者點擊的時候才去檢查是否擁有這些權限,如果沒有android會跳出如上的提示視窗跟使用者要求權限,只有在permission 被允許之後,我們才能繼續做後續的事情,例如錄影...

其實這對使用者的經驗是一大提升,因為使用者可以很確切地知道你的權限是用在哪個地方,當然前提是你沒有一打開app就把所有權限一次拿完XD

不過由於這些使用者經驗的提升,也造成了程式碼上一定幅度的修改

首先以上面的例子來說當button click我必須做檢查我是否擁有這個權限

 if (checkSelfPermission(Manifest.permission.READ_PHONE_STATE) == PackageManager.PERMISSION_GRANTED) {

如果沒有權限我們可以利用requestPermissions來取得我們需要的權限
requestPermissions(new String[]{Manifest.permission.READ_PHONE_STATE},
                            PERMISSION_REQUEST_PHONE);


requestPermissions之後會跳出上方的提示視窗,必須等使用者按下allow or deny之後才會產生callback

  @Override
    public void onRequestPermissionsResult(int requestCode, String[] permissions, int[] grantResults) {
        super.onRequestPermissionsResult(requestCode, permissions, grantResults);
    }

我們可以在onRequestPermissionsResult處理相關的動作,例如當permission成功取得時應該顯示啥,或者當沒有成功取得權限時應該怎麼辦之類的動作

其實以一個開發者的角度來說,雖然有那麼多的好處,但是這其實提升了程式的複雜度,讓原本的流程又多出了一個callback 判斷時間點,真是有利必有弊啊

不過目前這個功能並不是強制性的,所以舊app還是可以走原本的邏輯,也就是下載時讓使用者看到所有個權限,並且一次性的取得所有權限

但是如果要使用新的功能則必須將下面三個設定都使用新的設定才行
compileSdkVersion 'android-MNC'
minSdkVersion "MNC"
targetSdkVersion "MNC"

如果使用了MNC版本請記得一定要做permission check 否則就會出現

螢幕快照 2015-06-03 下午9.56.53.png


最後還是要附上sampel code
https://github.com/nightbear1009/M-Permission

2015年5月31日 星期日

Android 開發 (九十九) What's New in M support-design-widget NavigationView

NavigationView的使用情境是在側欄

套上navigationview 讓你可以較容易的刻出material的樣板
你只需要在layout裡放

<android.support.design.widget.NavigationView    android:id="@+id/navigation"    android:layout_width="wrap_content"    android:layout_height="match_parent"    android:layout_gravity="start"    app:headerLayout="@layout/headerlayout"    app:menu="@menu/menu_main" />

headerlayout為上方的板塊,headerlayout 可以利用addHeaderView
增加header 剩餘下方的選項,如上方的settings 則是寫在menu裡
利用menu做設定,這種設計的作法,感覺google也是想告訴我們
側欄應該只放設定相關的東西,而不應該放太多有的沒的資訊吧.

Android 開發 (九十八) android studio 1.13 databinding part2

上一篇有提到,databinding的介紹,今天這篇要介紹的是,
假設model變更時,要如何讓view也跟著改變呢?

其實方法很簡單,android 有提供新的class BaseObservable
如下圖

    public class User extends BaseObservable {
        private String firstName;
        private String lastName;

        @Bindable
        public String getFirstName() {
            return firstName;
        }

        @Bindable
        public String getLastName() {
            return lastName;
        }

        public User(String firstName, String lastName) {
            this.firstName = firstName;
            this.lastName = lastName;
        }

        public void setFirstName(String firstName) {
            this.firstName = firstName;
            notifyPropertyChanged(BR.firstName);
        }

        public void setLastName(String lastName) {
            this.lastName = lastName;
            notifyPropertyChanged(BR.lastName);
        }
    }

我們只需要在set之後,call notifyPropertyChanged就行了

    TwowaydatabindingLayoutBinding binding;
    User user;
    private int i = 0;

    @Overrideprotected
    void onCreate(Bundle savedInstanceState) {
        super.onCreate(savedInstanceState);
        binding = DataBindingUtil.setContentView(this, R.layout.twowaydatabinding_layout);
        user = new User("Test", "User");
        binding.setUser(user);
        findViewById(R.id.btn).setOnClickListener(new View.OnClickListener() {
            @Override
            public void onClick(View view) {
                user.setLastName("change " + i);
                Toast.makeText(view.getContext(), " " + user.getLastName(), Toast.LENGTH_SHORT).show();
                i++;
            }
        });
    }
如上面的code所示,我在按鈕click的時候去改變user的lastName
然後edittext的lastname就會跟著改變

其實這種方法很像是adapter的notifydatasetChanged
不過目前這種方法只能用在 data change 通知 ui 改變
但是 ui 改變 -> data change這條路似乎還沒有看到任何的解法

希望在 android M正式release 的時候可以有 two-way binding的寫法出現.

2015年5月30日 星期六

Android 開發 (九十七) android studio 1.13 databinding part1

databinding 之前在寫windows的時候就用過,由於非常好用,
所以一直期待android 也可以support,如今android studio 1.13 support了這個功能!!

現在就來介紹如何使用

首先必須先將android studio升級到1.13
接下來必須在專案的 build.gradle裡加入
classpath 'com.android.databinding:dataBinder:1.0-rc0'

接下來必須在app的build.gradle裡加入
apply plugin: 'com.android.databinding'

然後就可以在app裡使用databinding的功能了

<?xml version="1.0" encoding="utf-8"?><layout xmlns:android="http://schemas.android.com/apk/res/android">    <data>        <variable name="user" type="com.designsupportlibrary.normaldatabinding.NormalUser"/>    </data>    <LinearLayout        android:orientation="vertical"        android:layout_width="match_parent"        android:layout_height="match_parent">        <EditText android:layout_width="wrap_content"            android:layout_height="wrap_content"            android:text="@{user.firstName}"/>        <EditText android:layout_width="wrap_content"            android:layout_height="wrap_content"            android:text="@{user.lastName}"/>        <Button            android:id="@+id/btn"            android:layout_width="wrap_content"            android:layout_height="wrap_content" />    </LinearLayout></layout>

如上面的xml file data代表著要連動的model
這代表著我們有一個 user class

public class NormalUser  {
    private String firstName;    private String lastName;
    public String getFirstName() {
        return firstName;    }
    public String getLastName() {
        return lastName;    }

    public NormalUser(String firstName, String lastName) {
        this.firstName = firstName;        this.lastName = lastName;    }

    public void setFirstName(String firstName) {
        this.firstName = firstName;    }

    public void setLastName(String lastName) {
        this.lastName = lastName;
    }
}

接著我們只需要將normalUser 與 ui 做綁定的動作即可
    NormalMainBinding binding;
    NormalUser user;

    @Overrideprotected
    void onCreate(Bundle savedInstanceState) {
        super.onCreate(savedInstanceState);
        binding = DataBindingUtil.setContentView(this, R.layout.normal_main);
        user = new NormalUser("Test", "User");
        binding.setUser(user);
        findViewById(R.id.btn).setOnClickListener(new View.OnClickListener() {
            @Override
            public void onClick(View view) {
                Toast.makeText(view.getContext(), user.getLastName(), Toast.LENGTH_SHORT).show();
            }
        });
    }

所以這邊代表的意思就是,
首先我們會create一個binding的物件,他與view做綁定,但是我們還沒有將data餵給他
接著我們init User ,然後使用setUser 將 view 與 資料綁定

這時候 上方的edittext 就會去取得 firstName的資料
而下方的edittext就會去取得 lastName的資料,

不過目前的綁定方法就只有set下去的瞬間而已,之後你再對user做任何的改變都不會有其他相對應的變化了,如果要有相對應的變化,那就必須針對User做額外的動作,
不過這個就得等到part2 的時候再說囉XD

2015年5月29日 星期五

Android 開發 (九十六) What's New in M support-design-widget TabLayout

先讓我們看一下圖


在TabLayout出來之前,如果要做出類似的功能,除了自己刻之外,我想大部份的人都會利用https://github.com/astuetz/PagerSlidingTabStrip這個library吧

這個TabLayout 讓我們可以使用官方的api 而不用再依照3-party lib,不用再擔心library不再維護的問題了XD

接下來介紹該如何實做

跟正常的viewpager and tab一樣必須定義這兩個layout
<LinearLayout xmlns:android="http://schemas.android.com/apk/res/android"
    android:layout_width="match_parent"
    android:layout_height="match_parent"
    android:orientation="vertical">

    <android.support.design.widget.TabLayout
        android:id="@+id/tabs"
        android:layout_width="match_parent"
        android:layout_height="wrap_content" />

    <android.support.v4.view.ViewPager
        android:id="@+id/viewpager"
        android:layout_width="match_parent"
        android:layout_height="match_parent" />
</LinearLayout>

接下來只需要initViewpager
ViewPager viewPager = (ViewPager) findViewById(R.id.viewpager);setupViewPager(viewPager);
TabLayout tabLayout = (TabLayout) findViewById(R.id.tabs);
tabLayout.setupWithViewPager(viewPager);
tabLayout.setTabMode(TabLayout.MODE_SCROLLABLE);

然後再使用 setupWithViewPager 將viewpager set 進去就行了,
這邊有一個設定要特別注意, setTabMode 有分 MODE_FIX and MODE_SCROLLABLE
其中如果使用MODE_SCROLLABLE  tab的textview的寬度才會正常顯示,否則textview的寬度會只有一個字的寬度

如上圖所示

不過在使用這個api的時候有遇到一個問題,當我利用下面的程式碼
tabLayout.setTabTextColors(Color.BLUE,Color.parseColor("#FF2750"));
想要更換tab的顏色時,卻無法正確更換,
當然還有下面那條線的顏色,目前還找不到更換的方法,
我猜測只能由theme來更換了. 如果有試出來再跟大家分享囉

Android 開發 (九十五) What's New in M support-design-widget Snackbar

What's SnackBar ? 讓我們看一下下面的圖片

SnackBar我們可以理解為進階版的toast
例如說當用戶刪除了某項商品,我們其實無法用比較不擾人的方式
去提示用戶是否要刪除該商品

如果用dialog 非常擾人
如果用toast 非常無感...而且無法做任何undo的動作

SnackBar應該是比較折衷的方式,利用show出一小段提示,讓用戶有機會可以反悔

講了那麼多我們要來介紹來如何實做了
要使用SnackBar我們只需要
    findViewById(R.id.btn).setOnClickListener(new View.OnClickListener() {
        @Override public void onClick (View view){
            SpannableString s = new SpannableString("you just remove this product");
            s.setSpan(new ForegroundColorSpan(Color.RED), 0, s.length(), Spannable.SPAN_EXCLUSIVE_EXCLUSIVE);
            Snackbar.make(view, s, Snackbar.LENGTH_SHORT).setAction("undo", new View.OnClickListener() {
                @Override
                public void onClick(View view) {
                    Log.d("Ted", "do click");
                }
            }).setActionTextColor(Color.parseColor("#FF2750")).show();
        }
    });

如上使用 Snackbar.make(...).show()就可以了,比較跟toast不同的地方在於,
snackbar需要view,而且文字可以換色,並且擁有click event,

在這邊還有一件事情要特別提到,Snackbar並沒有提供設定左邊文字顏色的api,
不過我們可以利用SpannableString來換色,如上面的sample code

我想之後很多app都會使用到這樣的特效吧. 個人真的認為還蠻實用的!!

Android 開發 (九十四) What's New in M support-design-widget FloatingActionButton

what's FloatingActionButton? 讓我們來看看下面的圖


值得注意的是我的版本是4.4 ,但是有shadow,而且點擊的時候也有shadow,
接下來我們要介紹如何實作,FloatingActionButton的實作方式更簡單
<LinearLayout xmlns:android="http://schemas.android.com/apk/res/android"
    xmlns:android.support.design="http://schemas.android.com/apk/res-auto"
    android:layout_width="match_parent"
    android:layout_height="match_parent"
    android:orientation="vertical">

    <android.support.design.widget.FloatingActionButton
        android:layout_width="wrap_content"
        android:layout_height="wrap_content"
        android:layout_gravity="end|bottom"
        android:src="@drawable/abc_ic_clear_mtrl_alpha"
        android.support.design:fabSize="mini" />

    <android.support.design.widget.FloatingActionButton
        android:layout_width="wrap_content"
        android:layout_height="wrap_content"
        android:layout_gravity="end|bottom"
        android:src="@drawable/abc_ic_clear_mtrl_alpha"
        android.support.design:fabSize="normal" />
</LinearLayout>

只需要將ui放到xml上就完成了XD
在這邊值得一提的是,floatingActionButton有一個property fabSize,
要在xml上使用則必須加上
xmlns:android.support.design="http://schemas.android.com/apk/res-auto"
才能正確使用,fabSize有分normal and mini如上圖,就是正常size和mini size

今天介紹floatingActionButton就到這邊,接下來還會有需多新的ui會介紹唷!!

Android 開發 (九十三) What's New in M support-design-widget TextInputLayout

google io 2015 推出了新的support lib.
其中包含了 'com.android.support:design:22.2.0'
這個lib多了許多實用的material ui ,最近會一一介紹

今天要介紹的是 TextInputLayout


如上圖當沒有focus而且沒有key字的時候,hint會顯示在edittext裡,
當focus時hint就會像是title一樣顯示在edittext上方,

我想上面的圖片很清楚的展示了他的效果

至於要如何實做?

首先必須在gradle裡加入
compile 'com.android.support:design:22.2.0'

接著在xml裡加入textinputlayout
<android.support.design.widget.TextInputLayout    android:id="@+id/inputlayout"    android:hint="name"    android:layout_width="wrap_content"    android:layout_height="wrap_content" >    <EditText        android:hint="name"        android:layout_width="wrap_content"        android:layout_height="wrap_content" /></android.support.design.widget.TextInputLayout>

記得要在裡面放一個EditText,然後目前的TextInputLayout有一些問題
除非在TextInputLayout 和 EditText 加上hint 還有在code裡面也加上hint
TextInputLayout inputLayout = (TextInputLayout)findViewById(R.id.inputlayout);inputLayout.setHint("name");

否則上面的效果不會出現(至少在我的模擬器上面是這樣子的 genymotion 4.4)
只需要簡單的步驟,我們就設定好了,是不是很簡單!!

2015年5月28日 星期四

Android 開發 (九十二) JobInfo

什麼是JobInfo? 其實可以把它想成進階版的alarmManager
例如我想要每天trigger一次,但是只有在手機充電的時候才會trigger
使用alarmManager其實沒有辦法做到,but with JobInfo you can

here is sample code

ComponentName serviceName = new ComponentName(this, MyJobService.class);JobInfo jobInfo = new JobInfo.Builder(JOB_ID, serviceName)
        .setPeriodic(10000)
        .setRequiresCharging(true)
        .build();JobScheduler scheduler = (JobScheduler) getSystemService(Context.JOB_SCHEDULER_SERVICE);int result = scheduler.schedule(jobInfo);

意思是每十秒會trigger一次 MyJobService, 但是只有在充電的情況下

public class MyJobService extends JobService {


    @Override    public boolean onStartJob(JobParameters jobParameters) {
        //do something        Log.d("Ted","startJob");                return true;    }
    
}

上面的sample 會造成每十秒trigger 一次  MyJobService

JobInfo其實算是蠻方便的功能,可惜只能在api21才能使用.

最後還是要附上sample code
https://github.com/nightbear1009/JobInfoSample

2015年5月27日 星期三

Android 開發 (九十一) Android L notification heads-up

今天要介紹如何在android裡添加 heads-up notification

主要的程式碼為  setFullScreenIntent
將 flag設為true就會出現heads-up notification了
如下
Notification notification = new Notification.Builder(MainActivity.this)
.setSmallIcon(R.drawable.ic_launcher)
.setFullScreenIntent(contentIntent, true)
.addAction(R.drawable.ic_launcher,"add",contentIntent)
.build();

在產生heads-up notification之後,接下來就是要研究如何設定btn的layout了
其實很簡單,我們只需要使用addAction即可,
第一個參數為icon ,第二個為wording,第三個為click之後的行為

如上圖,就是上面sample code產生的notification.

詳細的程式碼可以參考下面的連結
https://gist.github.com/nightbear1009/dd8d5a02f9dd566888c0

2015年5月23日 星期六

Android 開發 (九十) crashlytics 3.0 intro. Fabric

最近使用的crashlytics更新了,並且更名為Fabric,為了要跟上流行,所以就立刻將我的app做了升級的測試,其實主要並沒有太大的變更,不過這次主要要特別介紹兩個功能,
或許是舊有的,也可能是新的,小弟已經許久沒去follow他的文件

第一個功能是,可以紀錄crash的user資料,從前我們crash常常很難複製,其中一個原因就是我們不曉得使用者是誰,通常crash的人只會在googleplay上面寫


基於他們非常有用的提供協助給予我們線索,我想我們可以很快的解決掉這個問題

沒錯,現實是殘酷的,user絕對不可能會告訴我們他是在什麼樣的情境,什麼樣的畫面死掉
你只會看到他留下了一顆星加上不理性評語,所以怎麼辦,我們要想辦法在crash前留下更多的線索

而crashlytics提供了我們這樣的功能

        Crashlytics.setUserIdentifier("234489032");
        Crashlytics.setUserName("ted");
        Crashlytics.setUserEmail("123@google.com");

在app crash的時候就會將user資訊帶到他們的server去


這樣我們就又多了一項資訊可以判斷是否跟特定user有關

另一個功能我覺得也是很實用的功能,不知道大家是否也有以下類似的問題


app並不會crash但是user反應系統異常,這個問題要怎麼重現我也煩惱了很久
不過就在我看到了crashlytics的另一個功能之後,所有問題都迎刃而解啊

首先app不會crash最主要的原因一定是我們有做try catch,或者是額外的if else 處理..
所以我們就可以在那些判斷的地方將crashlytics的log功能加入

        try {
            throw new Exception();
        } catch (Exception e) {
            Crashlytics.log("something more info");
            Crashlytics.logException(e)
        }

如上,我們可以將更多的訊息帶入log 並且 使用 logException
這樣我們就可以在crashlytics看到更多相關的問題


這樣我們就有足夠的線索可以解決這些bug了

不過目前crashlytics還有一個很大的問題,就是有時候我們無法很確切地知道是死在哪個畫面,當下的view hierarchy,希望不久後會有相關的library能幫助我們提供相關的訊息啊

Android 開發 (八十九) facebook deeplink

相信有在開發app的大家,在facebook 上使用deeplink時,常常會遇到改版後就功能不正常的問題,由於最近我也遇到了類似的問題,所以就索性研究了facebook 的 document

deeplink 就是利用一個特定的連結,http://ted/123
然後假設user點擊該連結,如果該user有安裝 app則會開啟我的app
如果user沒有安裝app就會前往googleplay

今天要來介紹如何達到facebook 的 deeplink

目前facebook 有提供兩種 deeplink 的方式
第一種是你有特定的網站,特定的展示頁面
第二種是你沒有特定的網站,你只想create特定的連結

第一種是你有特定的網站,特定的展示頁面

例如下面的網站
http://tw.91mai.com/SalePage/Index/754680
這是一個銷售商品的頁面,我希望user在手機前往該頁面時會導向我手機版相對應的頁面
這時候我就可以使用第一種方法

方法其實很簡單,你只需要在網頁上加上 facebook 指定的meta即可

<head>
   
    <meta property="al:android:url" content="com.mypackage://story/1234">
    <meta property="al:android:package" content="com.mypackage">
    <meta property="al:android:app_name" content="myappName">
    <meta property="og:title" content="title" />
    <meta property="og:type" content="website" />
    
</head>
其中url 為 app要處理的資料,利用該資料就可以知道該user是在哪個頁面,我們就可以將app導向特定的頁面

package name就是app的 package name 這一個一定要跟app相同,否則會不work
app_name經過我的測試,隨便寫都可以
og:title 和 og:type 似乎是 必填欄位,如果沒特定需求就照著填就好了
更多相關的設定可以參考 http://applinks.org/documentation/


接著只要在app內加入這樣的程式碼就可以囉
<activity android:name=".MainActivity"
    android:label="@string/app_name" >
    ...
    <intent-filter>
        <action android:name="android.intent.action.VIEW" />
        <category android:name="android.intent.category.DEFAULT" />
        <data android:scheme="com.mypackage" />
    </intent-filter>
</activity>

@Override
protected void onCreate(Bundle savedInstanceState) {
    super.onCreate(savedInstanceState);
    FacebookSdk.sdkInitialize(this); 
    ...
    Uri targetUrl =
      AppLinks.getTargetUrlFromInboundIntent(this, getIntent());
    if (targetUrl != null) {
        Log.i("Activity", "App Link Target URL: " + targetUrl.toString());
    }
}
targetUrl就是特定的網址,我們就可以利用該url判斷應該導到app的哪個頁面


第二種是你沒有特定的網站,你只想create特定的連結

首先根據facebook 文件
你可以將你需要的參數填入,
其中最重要的是  url  你想帶入app的網址
package 你要開啟的app
curl https://graph.facebook.com/app/app_link_hosts \
-F access_token="APP_ACCESS_TOKEN" \
-F name="Android App Link Object Example" \
-F android=' [
    {
      "url" : "sharesample://story/1234",
      "package" : "com.facebook.samples.sharesample",
      "app_name" : "ShareSample",
    },
  ]' \
-F web=' {
    "should_fallback" : false,
  }'
接著你會得到一組id
{"id":"643402985734299"}
接著在利用下方網址 將上面的id 帶入
curl -G https://graph.facebook.com/643402985734299 \-d access_token="APP_ACCESS_TOKEN" \
-d fields=canonical_url \
-d pretty=true
接著會得到一組網址
{
   "canonical_url": "https://fb.me/643402985734299",
   "id": "643402985734299"
}
這個網址就是我們創造出來的網址,我們可以將這個網址貼到facebook上,只要有人點擊該link 有裝app 就會前往我們的app,沒有app的就會被導向googleplay

當然app還是要依照第一種方法做設定,這樣才app才可以攔截到該url,並且導到我們希望的頁面


Android 開發 (八十八) 使用AndroidJUnitRunner


android最近新增了

AndroidJUnitRunner


  • 能夠run JUnit3 and JUnit4的 test
  • 能夠做test filtering SmallTest MediumTest LargeTest
  • Activity /Application Life cycle Monitoring
今天會介紹如何使用AndroidJUnitRunner寫test case
defaultConfig {
        applicationId "com.androidtestcase"
        minSdkVersion 14
        targetSdkVersion 21
        versionCode 1
        versionName "1.0"
        testInstrumentationRunner "android.support.test.runner.AndroidJUnitRunner"
    }

android {
    packagingOptions {
        exclude 'LICENSE.txt'
    }
}

dependencies {
    compile fileTree(dir: 'libs', include: ['*.jar'])
    compile 'com.android.support:appcompat-v7:22.0.0'
    androidTestCompile 'com.android.support.test:runner:0.2'
    androidTestCompile 'com.android.support.test:rules:0.2'
    androidTestCompile 'com.android.support.test.espresso:espresso-core:2.1'
}
主要要加的地方有 packagingOptions那段
還有androidTestCompile那些code
接著就寫一個簡單的test吧,如下

@RunWith(AndroidJUnit4.class)
@SmallTest
public class testMyMethod {
    @Test
    public void test(){
        MyMethod m = new MyMethod();
        Assert.assertEquals(m.getData(),"data1");
    }
}


你只需這樣寫就能夠寫出一個簡單的測試
其中 SmallTest代表test 的size ,目前有分 small / medium/ large
想要測試smallTest 你可以先使用以下cmd


adb shell pm list instrumentation
他會列出test list 如下
instrumentation:com.androidtestcase.test/android.support.test.runner.AndroidJUnitRunner (target=com.androidtestcase)

例如我的package name為 com.androidtestcase 則我必須下cmd
adb shell am instrument -w -e size small com.androidtestcase.test/android.support.test.runner.AndroidJUnitRunner

這樣就只會測small的test case
可以依照需求,測試我想測的case


接著下面介紹了如何取得test case 的report

在console下command

./gradlew connectedAndroidTest
就可以得到test 的xml格式report


在console下command
./gradlew test
就可以得到html格式的report


xml格式的report比較適合在CI裡面使用,html格式的比較適合個人觀看用


結論
目前我使用新的AndroidJUnitRunner純粹是為了可以filter test size
當我只想做快速的unit test 的時候就不再需要重新跑一次所有的 ui test 囉!!

2015年5月19日 星期二

Android 開發(八十七) android studio 1.2

不知道大家是否都已經更新了android studio 1.2,
1.2多了很多新功能,


以前debug的時候總是要花很多時間去看參數的數值是什麼,
更新了1.2之後,當你在step by step debug時,參數都幫你寫在後面了,
真的是蠻方便的,不過最方便的不是這個,而是


以前if 裡面的判斷式總是要自己去看數值來判斷,如今他會直接幫你寫在上面,
真是貼心的設計啊!!!

還新增了CPU監測的功能

不過小弟目前也還不太知道要怎麼用這個功能,感覺是炫技(?!)
當然還有新的unit test 不過這部分小弟尚未研究到,等小弟研究完再一一跟大家介紹囉